The project template feature addresses the need to set up a template corresponding to a recurring project type within your business.
Once validated, the template is added to a library of standard projects—ready for you and your colleagues to use—that can be generated in just a few clicks.
The template you create will serve as the foundation for new projects, incorporating elements such as task lists and tasks, planification, member assignments, labels, custom fields, roles, workflows, and more.
You can create either “Beesbusy” templates or “internal” templates. The difference is that a “Beesbusy” template is available to all Beesbusy users, whereas an “internal” template is restricted to members of your subscription plan.
Use of an existing internal project template
If you need to use a project template because you are starting work on one of your standard activities, click “Create or search for a project” in the left-hand column.
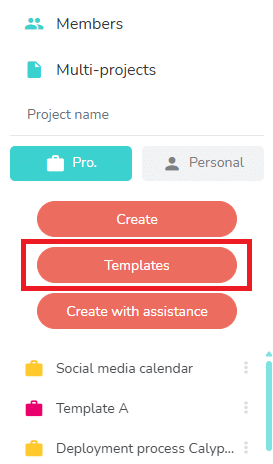
Below the field for entering the new project name, there are three red buttons. Click the “Templates” button:
Next, choose “Internal Templates,” select the relevant activity category:
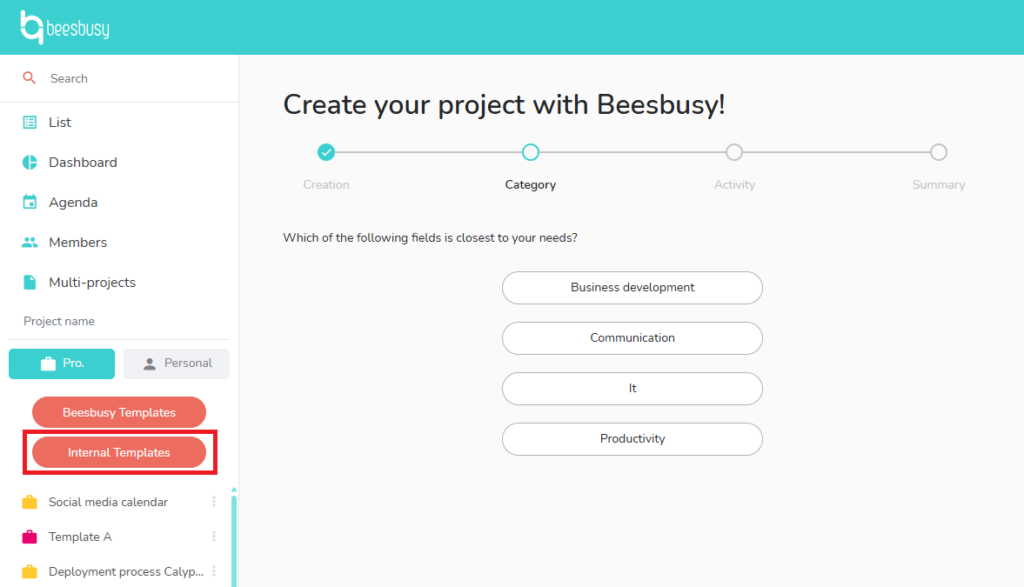
And finally, choose the project template you want to use.
Click the “Next” button, then edit the project name to easily distinguish it from other similar projects. Finally, click “Create project.”
Your new project appears at the very top of the project column on the left, incorporating all elements from the template.
The goal of creating a template project as described below is to allow you to build up a library of template projects that are available to all members of your subscription.
Formalization of a new project template
When creating your template, consider the structural elements that will be used every time: task lists, tasks, attachments, standard comments, members, labels, etc.
The list of elements that can be included in the internal template is available in the project settings, under the “Project template” section:
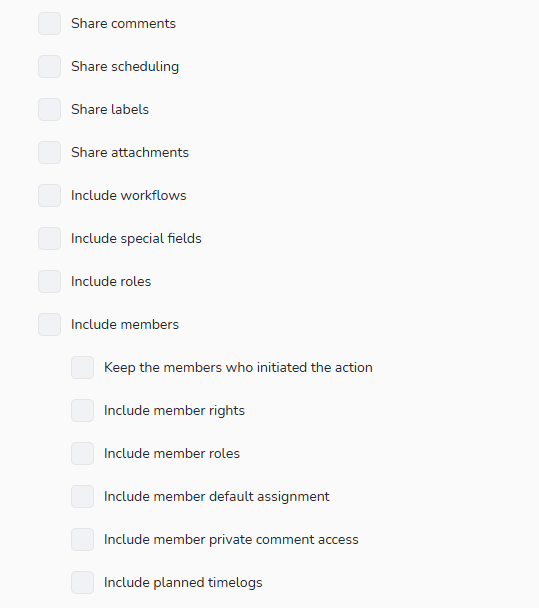
Check the box before each item you want to include in your template.
Once your template project is complete, you can ask your administrator to validate it.
Request validation of a new project template
Go to the project settings, under the “Project template” section.
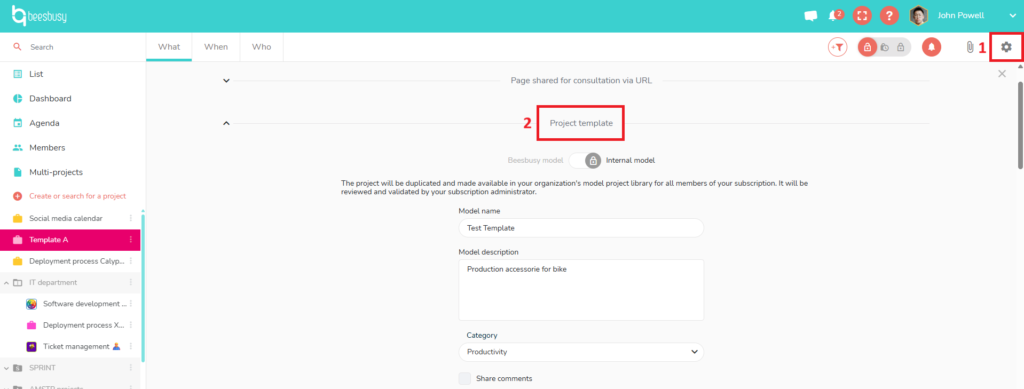
By default, you will be setting this up as an internal project template. However, you can use the toggle to switch to “Beesbusy model” if you prefer to make your template available to all Beesbusy users.
Before submitting it for approval, you must:
- Name your project.
- Select a category. If your administrator hasn’t created a category yet, you can do so right here by clicking “Other” and entering the desired category name in the “Category name” field.
- Choose which elements of your project should be included in the internal template:
- Comments
- Schedule
- Labels
- Attachments
- Workflows
- Custom fields
- Roles
- Members, including various options: permissions, roles, time planning, etc.
- You can also select a color for your template.Choose tags that describe your template.
- Finally, you can add a screenshot of your template, which will be visible in the template library and help the users to choose between various templates.
Once you have made your selections, click “Create template.”
The status will then show: “Template pending moderation…”
You will be notified whether your template is accepted or rejected.
Managing project templates as an administrator
The internal project templates are managed by the administrator of the subscription.
Approving or rejecting a request
As an administrator of a subscription, you will receive a notification when a request to approve a template project is submitted.
To view the submitted project, go to your Profile, subscription parameters, and navigate to the “Internal project templates” section.
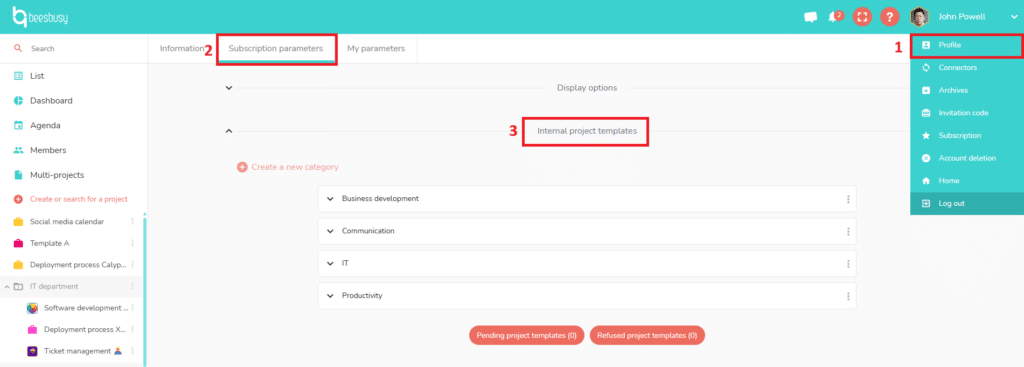
At the bottom of this section, a “Pending project templates” button allows you to view templates awaiting your approval.
Select the project template you wish to review. You will be directed to the project, where you can examine all its elements.
You can modify the template if necessary, then go to the project settings—specifically the “Project template” section—to approve or reject it.
If you reject the template, you must provide a reason. This explanation will be sent to the requester.
If you approve it, the requester will receive a notification confirming the approval. The template will then be available to all subscription members for use when creating new projects. It will also appear in the “Internal project templates” list within your subscription parameters, allowing you to manage it.
Modifying an existing template
You can modify a template that has already been approved. To do so, click the eye icon located to the left of the template project’s name.

This takes you to the project template, where you can make changes. All modifications take effect immediately; no further approval is required.
Managing project categories
You can add project categories to organize your library of project templates by clicking on the “Create a new category” button.
You can also move a project template from one category to another thanks to the 3 dots menu at the right of the project template’s name.
Finally, you can delete a category, provided it contains no projects, thanks to the 3 dots menu at the right of the category’s name.