Access your parameters to choose your settings by default
Go to your profile by clicking on the user drop-down menu on the top right of the screen. In your profile, select the “My parameters” tab.
The “My parameters” tab of your profile takes you to a page where 5 sections allow you, as a project creator, to choose a few default items:
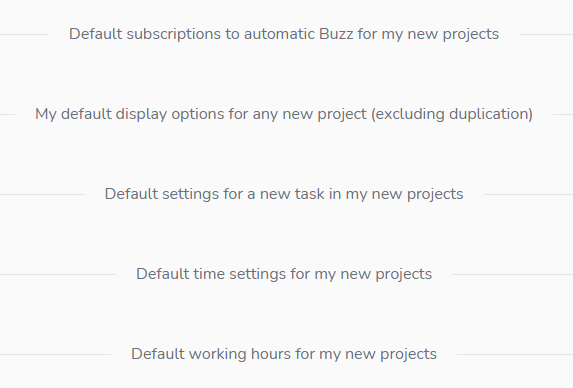
Default subscriptions to automatic notifications for my new projects
You can set automatic notification for your new projects as describe in the article to consult here: https://www.beesbusy.com/resources/features/project/automatic-notifications-in-a-project/
If you click on the “Apply to all projects” button, your settings will apply also to your existing projects.
My default display options for any new projects
These are the options described in the article “Display options of a project”: https://www.beesbusy.com/resources/features/project/display-options-project/
The options you define in your profile will apply by default to all your new create.
Later, if you wish, you can modify the options for a particular project.
Good to know: the display options are yours for any project. They do not apply to the display for other users, even sharing the same projects.
Default settings for new task in my new projects
The choice you make in this section of your profile will apply by default to all the projects you create. Later, if you wish, you can modify the settings for a particular project.
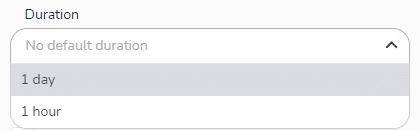
Set a default duration
You can assign a default duration of one day or one hour to new tasks created by clicking on the options in the drop-down menu.
Thus, the duration is automatically generated in the “When” tab of the task.
Assign by default the creator to the task
You can assign a task to its creator when the task is created by checking the relevant box.
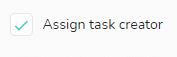
This configuration allows you to automatically add the member who created the task on the “Who” tab of the task.
These settings are similar as those described in the article “Beesbusy default task settings – Configure the options of the new tasks”: https://www.beesbusy.com/resources/features/project/default-configuration-options-for-a-new-task/
Default time unit for my new projects
If you are planning times or tracking times on your tasks, you can choose here to work in hours or in days by default.
This will apply to all your new projets.
Default working hours for my new projects
Define working hours for a typical week
Set up working hours allows you to indicate the days and hours that can be taken into account in the planning of a given project.
You have the option to set working hours for professional projects only.
To change the project type, read this article: https://www.beesbusy.com/resources/features/project/change-type-project/
When you set the default working hours for your projects, they are taken into account each time you create a new project. You can then adjust these in the settings of the project itself if the default settings are not appropriate.
Specify working hours by adjusting the blocks. You can also add new blocks by clicking on an empty space. To remove a block, click on the cross at the top left of it. You can have multiple blocks on a single day.

If, for example, you have a 4-day working week (Monday, Tuesday, Thursday and Friday) from 9 AM to 6 PM: If you schedule a 5-day task on Monday, the task will be scheduled until the following Monday to take into account your off day (ie, Wednesday) and weekends.
Please note that the quantity of hours worked defined in these parameters has an impact on the resources time planning.
Indeed, if you define that there are 7 hours worked in a day, then, when you schedule a time day on a member, this day will have a value of 7 hours. This value will be compared with the resource’s availability defined in its agenda to calculate its occupancy rate on the day in question.
Note 1: By default, working hours are set from Monday to Friday, 9 AM to 5 PM.
Note 2: Any modification of your default working hours will only apply when you create a new project afterwards, the modifications do not apply to your old projects.
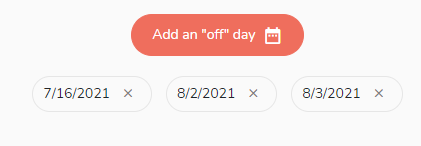
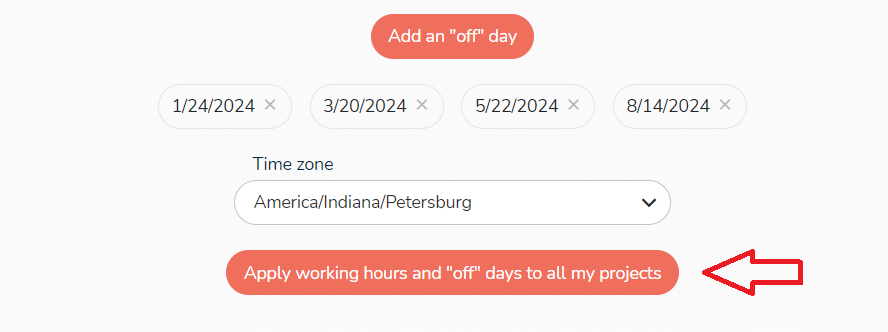
“Off” days
You can create “off” days in order to manage public holidays for instance, without changing your work schedule. To do this, click on the button “Add an ‘off day’” and select the chosen date in the calendar. You can select as many dates as you want. The “off” days will be automatically taken into account when you are scheduling tasks in your project.
Apply your settings to all projects
The choice of worked hours and off daysdefined above will normally apply to all projects you create in the future.
You also have the option of applying these default schedules and non-working days to all your projects, including those created before your settings were made.
To do this, click on the button:
A confirmation banner will appear asking you to confirm your action:

Click on “Confirm”.
The operation may take a few seconds, and a Buzz will be sent to announce the end of the configuration.
